What Roof Flashing Is (And Why Shingles Alone Aren't Enough)
Roof flashing is the thin material — most often galvanized steel, aluminum, copper, or a specialized membrane — installed to direct water away from the seams, joints, and transitions where two roof surfaces meet or where the roof meets something else, such as a chimney, wall, or vent pipe. Shingles, tiles, and metal panels do a great job of shedding water across the broad, flat field of a roof. But they can't seal the awkward angles, penetrations, and edges where the roof plane is interrupted. That's the job flashing was invented to do.
Think of your roof as a system rather than a single product. The covering (shingles, tile, metal) is the visible layer that takes the weather. Underneath sits the underlayment, a secondary water barrier. And at every interruption in that surface — a valley, a dormer, a skylight, a pipe — flashing bridges the gap and forces water back onto the roof and down toward the gutters instead of letting it slip into the seam. Remove or damage the flashing and you've left an open door right at the most water-prone points on the entire structure.
This is why so many leaks trace back to flashing rather than to the shingles. A roof covering can have years of life left and still leak badly if a single piece of flashing has lifted, corroded, or was installed poorly. Flashing is small, cheap relative to the whole roof, and easy to overlook — which is exactly why it deserves attention.
- Flashing seals the transitions a flat roof surface can't: valleys, walls, chimneys, skylights, and pipe penetrations.
- It works with underlayment as a layered defense, not as a standalone patch.
- Most roof leaks originate at a joint or penetration — meaning flashing, not the shingle field, is often the real culprit.
- Common materials include galvanized/galvalume steel, aluminum, and copper; the best choice depends on roof type, climate, and budget.
The Main Types of Roof Flashing
Flashing isn't one part — it's a family of parts, each shaped for a specific job. Knowing the names helps you understand a contractor's findings and spot which areas of your own roof are most at risk. Below are the types you're most likely to encounter on residential and light commercial roofs.
Each of these is a known failure point, which is why a thorough roof inspection spends as much time on flashing details as on the shingles themselves. The transitions are where craftsmanship shows — and where shortcuts come back to haunt a roof.
- Step flashing — small overlapping pieces tucked under shingles along a wall or sloped roof-to-wall junction; the workhorse of leak prevention where a roof meets a vertical wall.
- Valley flashing — lines the internal 'valley' where two roof slopes meet and channels the concentrated runoff from both sides; valleys carry a lot of water, so this is a high-stress area.
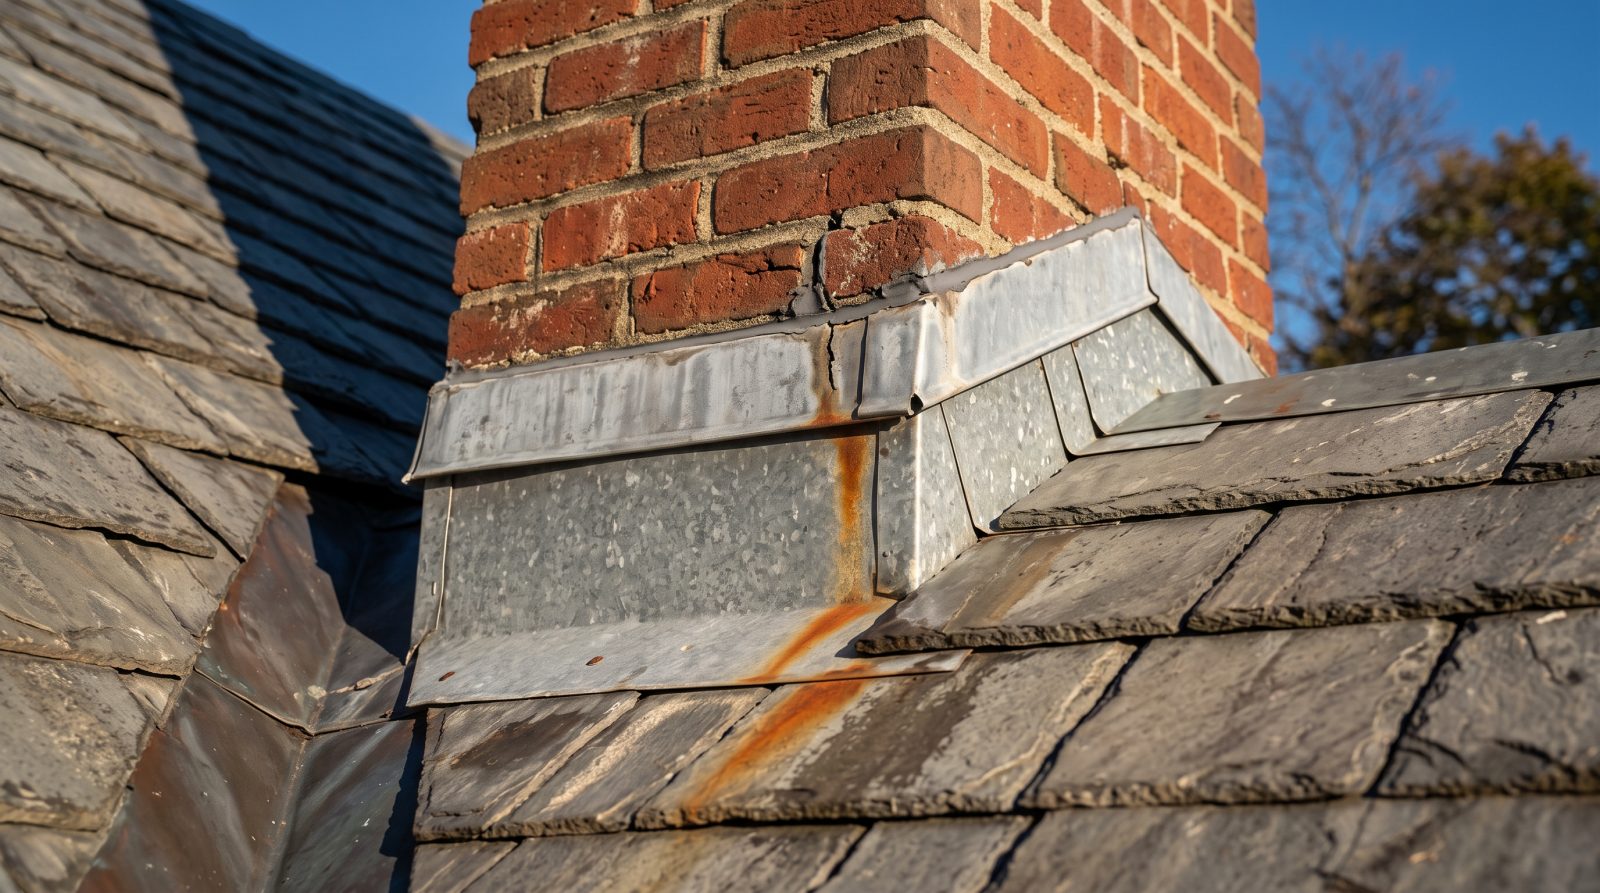
- Chimney flashing — typically a combination of base, step, and counter-flashing that wraps the chimney; one of the most common leak sources because it involves multiple pieces and a masonry joint.
- Vent pipe / boot flashing — a collar or 'boot' that seals around plumbing vents and exhaust pipes; the rubber gaskets on many boots dry out and crack years before the surrounding roof fails.
- Drip edge — metal flashing along the eaves and rakes that guides water into the gutter and protects the roof deck edge from rot.
- Counter-flashing — the upper layer (often set into masonry) that overlaps base flashing so water can't get behind it; common around chimneys and parapet walls.
- Skylight flashing — the kit or custom assembly that seals around a skylight; improper skylight flashing is a frequent source of mysterious ceiling stains.
- Kickout flashing — a small but critical piece at the bottom of a roof-to-wall junction that 'kicks' water away from the wall and into the gutter; missing kickout flashing causes hidden wall and siding rot.
Why Flashing Fails: The Most Common Causes
Flashing problems rarely announce themselves. They develop quietly over years and often reveal themselves only as a water stain on a ceiling — sometimes far from the actual entry point, since water travels along framing before it drips. Understanding the common failure modes helps you know what to look for and what questions to ask.
The single biggest cause of flashing failure is poor installation. Flashing is detail work, and it's where rushed or inexperienced workmanship shows first. Reused old flashing on a new roof, sealant smeared on as a substitute for proper metal work, missing kickout pieces, and incorrectly lapped step flashing are all problems that can pass a casual glance but fail under real weather.
Time and weather do the rest. Metal expands and contracts daily as temperatures swing, slowly working fasteners loose and opening gaps at seams. In coastal and humid regions, corrosion attacks steel flashing faster. In northern climates, freeze-thaw cycles and ice dams pry flashing up and force water under it. In hot, sun-exposed regions, the rubber boots around vent pipes degrade and crack under UV. Severe weather — high winds, hail, falling limbs — can bend, puncture, or tear flashing in a single event.
- Poor or rushed installation: improper lapping, reused old flashing, or sealant used in place of real metal flashing.
- Aged sealant and caulk: the soft sealant at flashing edges has a far shorter lifespan than the metal and needs periodic renewal.
- Corrosion and rust: especially on older galvanized steel, accelerated in coastal/humid climates.
- Thermal cycling: daily expansion and contraction loosens fasteners and opens seams over time.
- Ice dams and freeze-thaw (cold climates): water backs up under flashing and refreezes, lifting it.
- UV degradation of rubber pipe boots (hot/sunny climates): the gasket cracks years before the roof covering wears out.
- Storm damage: wind, hail, and impact can bend, lift, or puncture flashing in one event.
Warning Signs of Flashing Trouble — And How to Inspect Safely
Because flashing problems often surface as leaks elsewhere, learning the warning signs can save you from a small repair turning into rotted decking, ruined insulation, or interior damage. Many of these signs are visible from the ground with binoculars or from inside the attic — no ladder required, which is the safest way for a homeowner to look.
Inside the home, watch for water stains on ceilings or walls (especially near chimneys, where walls meet the ceiling, or around recessed lights), peeling paint, a musty smell, or daylight visible through the roof when you're in the attic. In the attic during or after rain, look for damp insulation, dark streaks on the underside of the decking, or active drips — these often point straight to a flashing failure above.
From outside, look for flashing that is visibly lifted, bent, rusted, or separating from the wall or chimney; cracked or hardened sealant at flashing edges; granule buildup or staining streaking down from a chimney or vent; and a missing kickout piece where a roof edge meets a wall (a frequent and damaging omission). A word of caution: climbing onto a roof is genuinely dangerous, and walking on it can cause more damage than it reveals. Inspect from the ground, from a stable ladder at the eave, or from inside the attic — and leave the on-roof work to professionals with the right equipment.
- Interior: ceiling or wall water stains (especially near chimneys), peeling paint, a musty smell, or daylight in the attic.
- Attic: damp insulation, dark streaks on the decking underside, or active drips after rain.
- Exterior: lifted, bent, or rusted flashing; flashing pulling away from a wall or chimney.
- Cracked, hardened, or missing sealant along flashing edges and pipe boots.
- Staining or streaks running down from a chimney, skylight, or vent penetration.
- Missing kickout flashing where a roof edge terminates against a wall — a common and damaging gap.
- Safety first: inspect from the ground, a stable ladder, or the attic; never walk an unfamiliar or wet roof.
Repair, Replace, or Reseal? Plus Typical Cost Ranges
Not every flashing issue requires the same fix, and a good contractor will match the solution to the actual condition rather than defaulting to the most expensive option. In broad terms there are three levels of response: resealing, repairing or replacing a specific flashing component, and replacing flashing as part of a larger roof project.
Resealing is appropriate when the metal flashing is sound but the sealant at its edges has aged or cracked. It's the lightest-touch fix and the most affordable, but it's a maintenance measure, not a cure for corroded or improperly installed flashing — fresh caulk over a failing flashing detail simply hides the problem temporarily. Component repair or replacement is the right call when a specific piece — a rusted chimney flashing, a cracked vent boot, a damaged valley — has failed. Replacing that element restores the seal without redoing the whole roof. Finally, when flashing failures are widespread or you're already replacing the roof covering, it's almost always wise to replace flashing at the same time; installing a new roof over old, tired flashing is a classic false economy.
Cost varies widely, so treat any figure as a typical industry range — an estimate, not a quote — that shifts with your region, roof pitch and height, material, accessibility, and the scope of the work. As a general guide, a simple reseal or a single vent boot replacement is often a modest, low-cost visit; chimney re-flashing tends to fall into a mid-range figure because it involves multiple components and sometimes masonry work; and full flashing replacement on a complex roof, or flashing folded into a complete re-roof, runs considerably higher. The only way to know your real number is an on-site assessment, because the same job can differ substantially between a single-story ranch and a steep, multi-gable home. For a clear, no-pressure evaluation, call Roof Repairs at (669) 259-2777 for a free roof assessment.
- Reseal: best when the metal is sound but edge sealant has aged; affordable, but maintenance — not a fix for corroded or misinstalled flashing.
- Repair/replace a component: the right move for a single failed piece (chimney flashing, vent boot, valley) without redoing the roof.
- Replace with the roof: when failures are widespread or you're re-roofing — don't put a new roof over old flashing.
- Cost drivers: region/climate, roof height and pitch, material, accessibility, and how many components are involved.
- All figures are typical estimates that vary; an on-site assessment is the only way to get an accurate price.
How Flashing Needs Vary by Region and Climate
Roofs across the United States face very different challenges, and flashing strategy should reflect the local climate. What protects a roof in the arid Southwest is not what a roof needs in the snowy Upper Midwest or the humid, storm-prone Gulf Coast. This is one reason a roof that performed fine in one part of the country may need different details after a move or a major renovation.
In cold and snowy regions, ice dams are a primary concern; flashing at eaves and valleys works alongside ice-and-water shield membrane to keep meltwater that backs up under shingles from reaching the deck. In coastal and humid areas, corrosion resistance matters more — many homeowners and contractors favor aluminum or copper over plain galvanized steel because salt air shortens the life of standard steel flashing. In hot, high-UV regions, the rubber components — especially pipe boots — break down fastest, so those are the parts to watch and replace proactively. And in regions prone to high wind, hail, and severe storms, properly fastened, impact-tolerant flashing and prompt post-storm inspections are the difference between a quick fix and a major repair.
The takeaway is simple: flashing is not a one-size-fits-all afterthought. It should be chosen and installed with your local weather in mind, inspected on a regular schedule, and given attention after any significant storm. Wherever you are in the country, Roof Repairs can help you understand your roof's vulnerable points and what to do about them.
- Cold/snowy climates: ice dams threaten eaves and valleys; flashing pairs with ice-and-water shield membrane.
- Coastal/humid climates: salt and moisture corrode plain steel faster; aluminum or copper often last longer.
- Hot/high-UV climates: rubber pipe boots degrade first and should be checked and replaced proactively.
- Storm-prone regions: prioritize secure fastening and inspect flashing after high winds or hail.